
How to Measure for Universal Fit Coilovers on a Solid Axle Vehicle: A Complete Guide
Over time, high-performance coilover shocks have become the go-to choice for off-road vehicles with custom suspension setups. Their versatility, tunability, and performance make them ideal for everything from weekend trail rigs to hardcore off-road race trucks. At AccuTune Offroad, we specialize in dialing in coilovers to match your specific needs—whether that’s rock crawling, desert running, or overlanding. Our goal is to make sure you get the right shock, the right tune, and the best performance the first time. In this guide, we’ll walk you through the key measurements needed to select the correct universal-fit coilover shock for your solid axle build, along with some expert tips along the way.
Terminology:
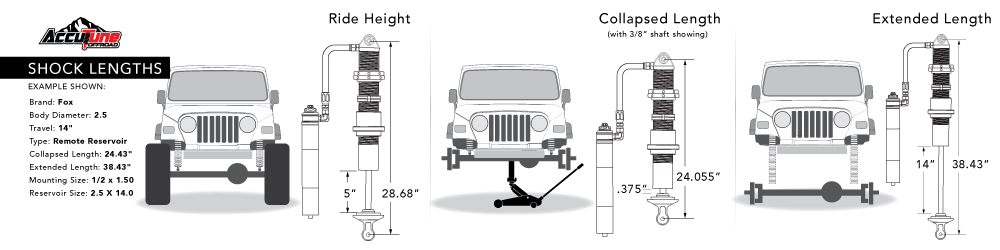
Ride Height – The final height of vehicle sitting on level ground.
Full Bump – Axle is level, and compressed all the way up to the frame, with bump stops fully compressed.
Full Droop – Axle is furthest from frame until other components start to bind or rub.
Up Travel – From ride height, the amount of shock travel going to full compression.
Down Travel – From ride height, the amount of shock shaft travel you have going to full extension.
Fitment
When measuring for shock length, it’s critical to consider both the mounting location and the available space around the shock. Start by identifying a solid, reliable mounting point on the axle or control arm—ideally as far outboard as possible. Positioning the coilover toward the wheel helps reduce clearance issues during articulation and improves suspension performance.
Be sure to leave enough room for the coil springs as well: a 2.0″ shock typically runs a 3.5″ spring, while a 2.5″ shock uses a 4.0″ spring, both measured by outside diameter. Don’t overlook the upper mount—check for possible interference with the hood, fender, or inner structure when the shock is fully compressed. These details are key to ensuring proper fitment and long-term durability.
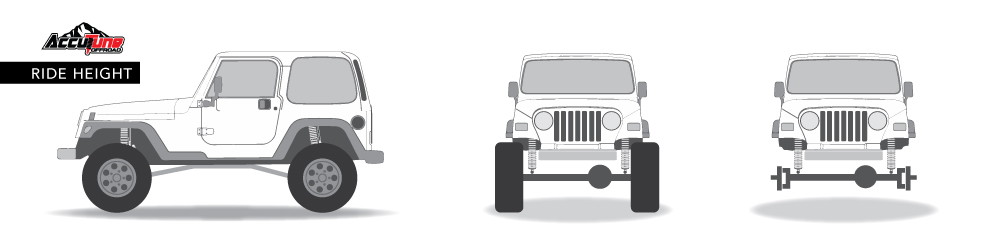
Ride Height
When planning your suspension setup, it’s important to consider your build platform and driving style to estimate your ideal ride height. A lower ride height generally improves stability, which is great for technical crawling and on-road handling, but it can reduce ground clearance and limit up travel—both of which are crucial for higher-speed off-road performance.
Ride height is largely a matter of personal preference; there’s no universal “correct” height. Once you’ve got a rough idea of where you want the vehicle to sit, it’s a good idea to bolt the tires on and check for both ground and fender clearance. Before cycling the suspension to measure for shocks, ensure your suspension links are installed or at least mocked up so you can get accurate measurements.
That said, don’t stress too much about nailing ride height at this stage—it may shift slightly as you fine-tune your shock lengths and spring setup.
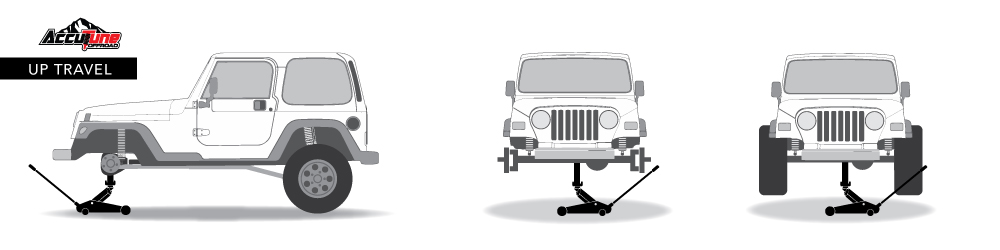
 Up Travel
With the chassis sitting at your intended ride height, the next step is to determine your compressed shock length. Jack the axle straight up until it reaches full bump—this is the point where the axle contacts the frame, engine, or where components like driveshafts or steering begin to bind. It’s best to have your actual tire size mounted during this step to ensure accurate fender clearance checks.
As you cycle the suspension, observe where components make contact or bind. Depending on your type of build—whether it’s a rock crawler, buggy, or prerunner—this will help determine how much up travel you can realistically use. If you see room for improvement, such as trimming or relocating components for more clearance, make a note for future modifications.
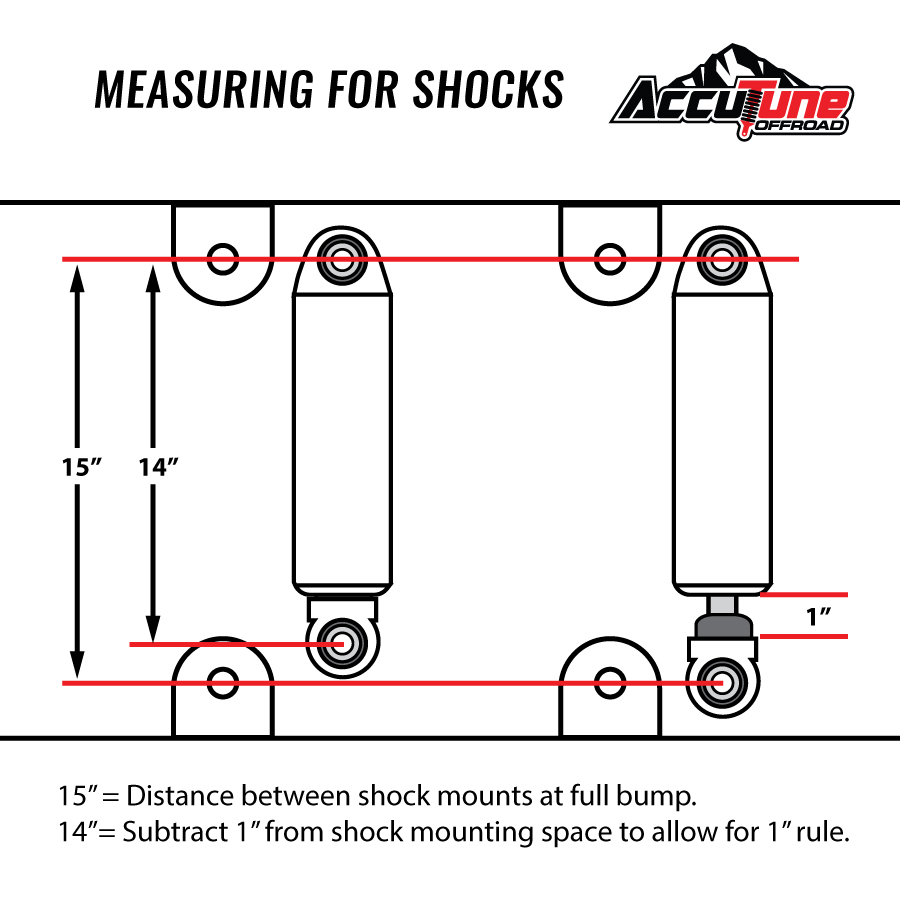
Once you’re at full bump, measure from your planned lower shock mount (typically on the axle or control arm) to the upper shock mount location on the chassis. Subtract 1 inch from this measurement. This accounts for the internal bump stop (usually 5/8″) and the small amount of exposed shaft at full compression (about 3/8″). That 1″ cushion ensures the shock doesn’t bottom out internally under full compression.
This final number is your compressed shock length.
Minimum Up travel suggestions (solid axle)
Rock Crawling = 4” Trail Riding = 5” Desert Racing / Ultra4 Type = 7”
We suggest dedicating 1/3 to 2/3 of shock travel for up travel, depending on application.
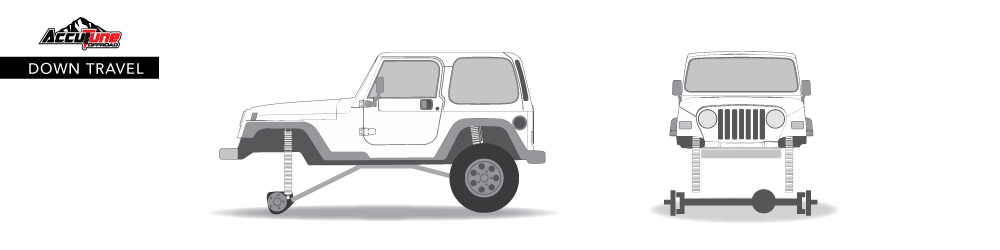
Down Travel
Using the same approach as we did for compressed shock length, the next step is to measure for extended shock length. With the chassis still sitting at ride height, slowly lower the axle down until it reaches its natural limit—this could be caused by binding in the steering, driveshaft angles, brake lines, or suspension links. Be cautious not to overdo it. If you’re not building a Trophy Truck, excessive droop can create more problems than benefits, like poor ride quality or damaged components.
Once the axle reaches its max safe droop, measure from your lower shock mount to the upper shock mount—just like before. This gives you the extended length of the shock. At this point, you should have both your compressed and extended shock length measurements.
With those two numbers in hand, you can now choose a shock with a matching travel range. Common off-road shock lengths are:
- 10” travel
- 12” travel
- 14” travel
- 16” travel
Pick the one that best fits within your measured range without overextending or bottoming out. This sets the foundation for a dialed-in suspension setup.
Down Travel Suggestions:
9” droop max, otherwise springs too soft and the vehicle will not handle well.

Articulation
Once you’ve established the up and down travel of your axle, it’s time to move on to articulation—cycling one side of the axle at a time to simulate real-world flex. During articulation, shocks often get much closer to the frame, tires, and body panels, so check all clearances carefully. Fenders, bumpers, and even inner wheel wells are common spots for interference, especially with larger tires.
Watch how close the shocks get to nearby components and be ready to reposition mounting points if needed. If you’re hitting clearance issues, you might need to adjust shock placement, modify bump stops, or trim fenders.
Make sure to:
- Flex both sides of the axle independently
- Spin and turn the tires lock-to-lock during articulation
- Watch for brake line stretch, driveshaft bind, and potential shock contact
- Consider future upgrades like larger tires and plan accordingly
It’s okay if your shocks bottom out during articulation—they often act as the mechanical stop to keep tires from hitting bodywork. Just make sure it’s happening in a controlled and predictable way.
Measure twice, order once. Take your time cycling the suspension thoroughly—accuracy now will save headaches later. Want help selecting the right shock size based on your measurements?
Here are some final tips to dial in your coilover shock setup:
- Aim for 1/3 to 2/3 up travel: Your shock should ideally have about one-third of its travel as droop and two-thirds as compression (up travel). This provides better control and prevents harsh bottom-outs.
- Limit droop to 9” or less: Excessive droop can lead to poor handling, shock overextension, and driveline issues. Stick to 9” or less for most solid axle builds.
- Popular shock lengths:
- 14” travel is the most common and versatile
- 12” works well in tighter builds
- 16” is great for more aggressive setups but requires more space and planning
- Ride height may need tweaking: Be prepared to raise or lower your ride height and re-check clearances and measurements during mock-up.
- Going big? Consider trailing arms: If you’re chasing more than 16” of travel, a Trailing Arm Suspension design may be required for proper geometry and performance.
- 18” coilovers are rare: There are very few spring options for 18” coilovers, which limits tuning flexibility and ride quality. Stick with 16” or shorter unless you’re building a high-end, race-style setup.
Need help calculating shock specs based on your mock-up? I can help you narrow it down.
Here’s a cleaner, more engaging version of your text:
You’ve Got Measurements—Now Let’s Find the Right Shocks
With your compressed and extended lengths in hand, it’s time to match those numbers to available shock options. Be sure to select shocks that offer a good balance of up travel and down travel—this is critical for both performance and reliability. If you’re coming up short on travel, consider a Trailing Arm Suspension system, which allows the coilover to mount on the control arm for increased stroke.
Once you’ve narrowed down the type and size of coilover you want, we’ll take it from there. Just fill out our quote request form with your vehicle info and email it to us. As part of our complimentary service, we’ll calculate your spring rates, go over your driving style, and discuss custom shock tuning options—all tailored to your build at no extra charge.
All coilover springs also include our unlimited spring swapping program, so you’re guaranteed to get the perfect rates for your setup.
Still have questions? We’re here to help.
Sales@AccuTuneOffroad.com
(619) 722-8555
Coilover Shock Quick Links:


Very good article on how to measure properly for the correction set of coilovers.
It’s a really impressive and well-elaborated blog. Also, thanks for sharing that amazing video.
Very well done , great article ! Customer service at its finest . That has helped me to decide I will be going with Accutune for my suspension set up for sure . Fox coil overs on my Ranger 😉 can hardly wait . Thanks guys
Regarding up travel statement: ” Now add 1? to the overall length of that measurement.” Shouldn’t it be subtract 1″? For example, if the measured shock mount distance at full bump is 15″, then we add 1″ to get a 16″ fully compressed shock length, then the shock would be too long for the available space at full bump.
Good catch Dan, you are correct. You would need to subtract an inch from the available mounting distance to account for our 1″ rule. I updated the text and added an image to help. Thanks!