Adjusting Preload on OEM Fit Front Coilovers
July 13, 2021


How to Adjust Preload on Aftermarket Front Coilovers
This guide explains how to adjust preload on most aftermarket front coilovers for trucks and SUVs. Adjusting preload changes your ride height (or lift height), whether you’re doing it for better stance or improved performance.
Disclaimer: Preload adjustments should be performed by a qualified mechanic. AccuTune Offroad is not responsible for any damage to you, your vehicle, or your suspension. This guide specifically references Fox and King coilovers and is intended for general use across a variety of vehicles with adjustable coilovers.
Before You Begin
If your coilovers are not yet installed, now is the perfect time to record your stock ride height. This will give you a baseline to compare against after the new suspension is installed.
There are a few ways to measure ride height. Choose the method that works best for you, such as:
-
Ground to center of the front differential skid plate
-
Center of wheel to bottom edge of fender
After Installation
Once your coilovers are installed, drive the vehicle a short distance to allow the suspension to settle. Then:
-
Park the vehicle on a flat, level surface.
-
Measure the shock length and spring length on both the driver and passenger sides.
It’s completely normal for the lengths to differ slightly from one side to the other.
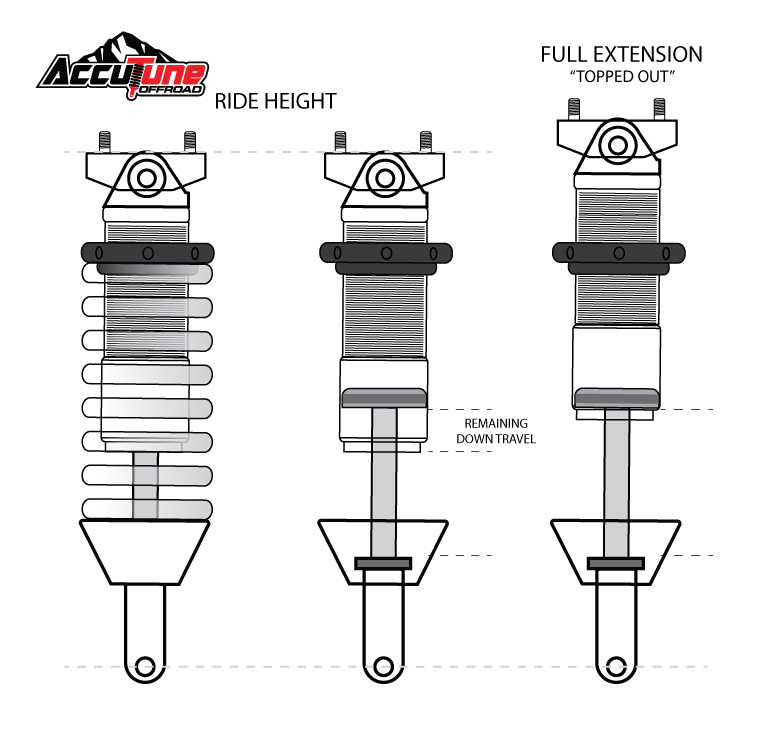
Understanding Shock Position at Ride Height
After recording the measurements for both front coilovers, the next step is to determine how much of the shock’s travel is being used at ride height. To do this, compare your current shock length (while the vehicle is sitting at ride height) to the shock’s fully extended length.
If the shock is nearly fully extended at ride height (i.e., close to being “topped out”), the suspension will ride poorly, feel harsh, and reduce performance. While having too little up-travel is a problem, too little droop is usually more critical and more common.
AccuTune Offroad Recommended Shock Lengths at Ride Height
From our experience, we recommend a minimum of 3” of wheel droop from ride height to maintain good ride quality and performance. Based on that guideline, we’ve calculated the maximum recommended shock lengths at ride height for several popular vehicles (see chart below). These values are determined using each shock’s extended and compressed lengths and the motion ratio of the suspension.
If your vehicle and shock combination is listed in the chart, and you’d like to make changes to ride height or preload, you’re in the right place—continue reading below.
If your setup isn’t listed, we may not have the data needed to give you an exact recommendation for ride height shock length. In that case, reach out to our team for more guidance.
Max Shock Length Chart
Shock data as of 2/25/25. Manufactures may update lengths without notice, please verify your lengths before proceeding. Please refer to this diagram to confirm how our measurements are being taken.
| Vehicle | Description | Part Number | Compressed Length | Extended Length |
Recommended Max Shock Length at Ride Height
|
| 05-23 Tacoma | Fox 2.0 IFP Coilover 0-2″ | FOX-985-02-002 | 17.6 | 22.225 | 20.625 |
| Fox 2.5 IFP Coilover 0-2″ | FOX-880-02-361 | 17.58 | 22.19 | 20.5 | |
| Fox 2.5 IFP Coilover 0-3″ | FOX-883-02-025 | 17.58 | 22.52 | 21 | |
| Fox 2.5 Coilover 0-2″ | FOX-880-02-376 | 17.59 | 22.13 | 20.5 | |
| Fox 2.5 Coilover 0-3″ | FOX-880-02-418 | 17.59 | 22.55 | 21 | |
| Fox 2.5 PES Coilover 0-3″ | FOX-883-06-178 | 17.19 | 22.42 | 21 | |
| Fox 2.5 Coilover 4-6″ | FOX-883-02-048 | 20.45 | 26.25 | 24.625 | |
| King 2.5 Coilovers 0-2″ | KRS-25001-119 | 17.308 | 22.375 | 20.75 | |
| King 2.5 Coilovers 0-3″ | KRS-25001-119-EXT | 17.3 | 22.6 | 21 | |
| Ride 2.5 Coilovers 1.5-2″ | 525412389, 525412589 | 16.61 | 22.6 | 21 | |
| 24+ Tacoma | King 2.5 Coilovers | KRS-25001-408A | 18.72 | 25.127 | 23.252 |
| Fox 2.5 PES Coilovers | FOX-883-06-224 | 18.61 | 25.08 | 23.205 | |
| 03-24 4Runner | Fox 2.5 IFP Coilover 0-2″ | FOX-883-02-130 | 17.58 | 22.19 | 20.5 |
| Fox 2.5 IFP Coilover 0-3″ | FOX-883-02-025 | 17.585 | 22.52 | 21 | |
| Fox 2.5 R/R Coilover 0-2″ | FOX-883-02-111 | 17.09 | 21.88 | 20.25 | |
| Fox 2.5 R/R Coilover 0-3″ | FOX-883-02-130 | 17.09 | 22.38 | 20.875 | |
| King 2.5 Coilovers | KRS-25001-278 | 17.246 | 22.313 | 20.75 | |
| King 2.5 Coilovers -EXT |
KRS-25001-278-EXT
|
N/A | N/A | N/A | |
| King 2.5 Coilovers (KDSS) | KRS-25001-243 | 17.308 | 22.625 | 21 | |
|
King 2.5 Coilovers – EXT (KDSS)
|
KRS-25001-243-EXT
|
N/A | N/A | N/A | |
| Ride 2.5 Coilovers 3-3.5″ | 525413289, 525413489 | 16.61 | 22.60 | 21 | |
| 07-21 Tundra | Fox 2.0 IFP Coilover 0-2″ | FOX-985-02-004 | 19.4 | 25.325 | 23.25 |
| Fox 2.5 IFP Coilover 0-2″ | FOX-883-02-021 | 19.36 | 25.37 | 23.375 | |
| Fox 2.5 R/R Coilover 0-2″ | FOX-880-02-367 | 18.86 | 25.33 | 23.25 | |
| Fox 2.5 R/R Coilover 0-3″ | FOX-880-02-947 | 18.86 | 25.53 | 23.5 | |
| King 2.5 R/R | KRS-25001-143 | 18.147 | 25.083 | 23.043 | |
| King 2.5 R/R |
KRS-25001-143-EXT
|
18 | 25.7 | 23.66 | |
| 22+ Tundra | Fox 2.5 PES Coilovers | FOX-883-06-218 | 16.31 | 21.68 | 20.125 |
| King 2.5 Coilovers | KRS-25001-396(A) | 16.277 | 22.25 | 20.125 | |
| 14-20 F150 | Fox 0-2″ 2.0 IFP | FOX-985-02-015 | 18.28 | 23.21 | 21.25 |
| Fox 2.5 R/R 0-2″ | FOX-883-06-132 | 17.95 | 23.49 | 21.625 | |
| King 2.5 R/R | KRS-25001-331 | 17.9801 | 23.325 | 21.525 | |
| 21+ F150 | Fox 2.5 PES Front Coilover | FOX-883-06-199 | 16.94 | 23.32 | 21.40 |
| King 2.5 Coilover | KRS-25001-367(A) | 17.695 | 23.325 | 21.40 | |
| 21+ Bronco | Fox 2.5 PES Front Coilover | FOX-883-06-212 or -209 | 18.79 | 24.26 | 22.50 |
| Fox 2.5 PES Rear Coilover | FOX-883-06-213 or -210 | 19.24 | 27.21 | 23.00 | |
| King 2.5 Front Coilover | KRS-25001-392A | 18.50 | 24.60 | 22.50 | |
| King 2.5 Front Coilover – with AOR Upgrade | KRS-25001-392A | 18.50 | 24.30 | 22.50 | |
| King 2.5 Rear Coilover | KRS-25001-393A | 18.50 | 27.00 | 23.00 | |
| Ride 2.5 Front Coilover | 525414389, 525414489 | 18.71 | 24.30 | 22.50 | |
| Ride 2.5 Rear Coilover | 525414589, 525414689 | 18.31 | 27.70 | 23.00 | |
| 07-18 Chevy/ GMC 1500 | Fox 2.5 IFP Coilover | FOX-883-02-028 | 15.015 | 20.365 | 18.69 |
| Fox 2.5 Coilover 0-2″ | FOX-883-02-121 | 14.9 | 19.34 | 17.66 | |
| Fox 2.5 Coilover 0-3″ | FOX-880-02-525 | 14.98 | 20.34 | 18.66 | |
| Fox 2.5 Coilover 4-6″ | FOX-883-06-079 | 15.28 | 21.41 | 21.5 |

What is Preload?
Preload is often misunderstood. It does not refer to how many threads are showing on your coilover. Instead, preload is the amount of tension applied to the coil spring before the weight of the vehicle is added—essentially, how much the spring is compressed in its unloaded state.
Preload is measured in inches, not threads.
Example:
If you have a 14” long spring, and it measures 12” tall when installed on a fully extended shock, then you have 2 inches of preload.
Preload = Free spring length – Installed spring length (with shock fully extended)
Proper preload is critical for setting ride height correctly and maintaining good ride quality. Too much preload can reduce droop travel and make the ride harsh. Too little preload may result in sagging or bottoming out.

Making Preload Adjustments
If you decide to adjust the preload on your coilovers, we strongly recommend using a professional-grade spring compressor designed for heavy-duty coil springs. These springs require a significant amount of force to compress safely.
For example, a 14” x 700 lb/in spring needs:
-
700 lbs of force to compress just 1 inch
-
1,400 lbs of force to compress 2 inches
That’s an enormous amount of stored energy—do not attempt to compress the spring without the proper tools.
Using a proper spring compressor will relieve enough tension to allow the preload collar (or nut) to spin by hand. Once the collar is free, make your preload adjustments carefully and evenly on both sides.

DIY Preload Adjustments (Not Recommended)
If you still choose to adjust preload yourself, do so with extreme caution. The vehicle must be safely lifted off the ground so the front suspension is fully extended and the coilovers are unloaded. This reduces spring tension, making the preload nut easier to adjust.
Follow these general steps:
-
Ensure the vehicle is off the ground and the shocks are fully extended.
-
Loosen the preload set screw—just enough to allow the preload collar to rotate (do not remove it).
-
Use a spanner wrench or punch to rotate the preload collar and adjust preload.
Note: Most King OEM-fit coilovers include a punch-style tool for preload adjustment. Fox does not include any adjustment tool.
While possible, we do not recommend this method, for several important reasons:
-
It requires significant physical effort to turn the collar while under spring tension.
-
You risk scratching the shock body and damaging the preload nut.
-
It’s common to round out the holes in the preload collar or skip threads, which can bind the collar or damage the shock body threads.
Replacing a damaged preload nut or shock body is complex and costly—it typically requires disassembling most of the coilover.
Preload vs. Lift Height
It’s important to understand that preload does not equal lift on independent front suspension (IFS) vehicles.
-
1 inch of preload does not equal 1 inch of lift
-
Due to the suspension’s motion ratio, small preload changes can create larger changes at the wheel
As a general rule of thumb:
½” of preload = 1” of lift at the wheel
(This varies by vehicle and control arm geometry)
Also remember:
-
Preload is not measured by the number of threads showing
-
Accurate preload is measured by how much the spring is compressed from its free length when the shock is fully extended

Final Step: Adjusting Preload
Make your preload adjustments as needed based on your desired ride height and performance goals.
Reminder: It’s completely normal for one coilover to show more threads than the other. This accounts for uneven weight distribution across the vehicle—such as a gas tank, battery, or aftermarket accessories.
Once the adjustments are complete and the coilovers are reinstalled:
-
Double-check that all hardware is properly torqued to spec
-
Lower the vehicle and allow the suspension to settle
-
Recheck your ride height and shock measurements to confirm both sides are where you want them
Repeat small adjustments if needed until the vehicle sits level and rides properly.
Check Ride Height
Once all preload adjustments are complete and everything is properly torqued, take the vehicle for a short drive. This allows the suspension to settle into its true ride height.
Park the vehicle on a flat, level surface—ideally the same spot where you took your original ride height measurements. Then:
-
Measure your shock lengths again to see how much higher or lower the vehicle sits compared to before.
-
Compare your new measurements to your target ride height.
-
Continue adjusting preload as needed to fine-tune the stance and performance.
Pro Tip: Use Shock Lengths to Dial in Preload
At ride height, measure your current shock length. Then, raise or lower the vehicle—either by adding weight or jacking it up—to find your ideal ride height.
Once you’ve identified that target shock length, calculate the difference from your current ride height. Use that difference to determine how much preload you need to add or remove.
This method provides a more precise way to set ride height without excessive trial and error.
TROUBLESHOOTING
Too much thread showing?

Don’t Worry About Threads Showing
Depending on your spring size, you might see a lot of threads above the preload collar. That’s totally normal and doesn’t mean your springs are wrong.
Different shock and spring manufacturers use different spring lengths, so it’s common to see more or fewer threads—even on a properly set up coilover.
Too much preload?
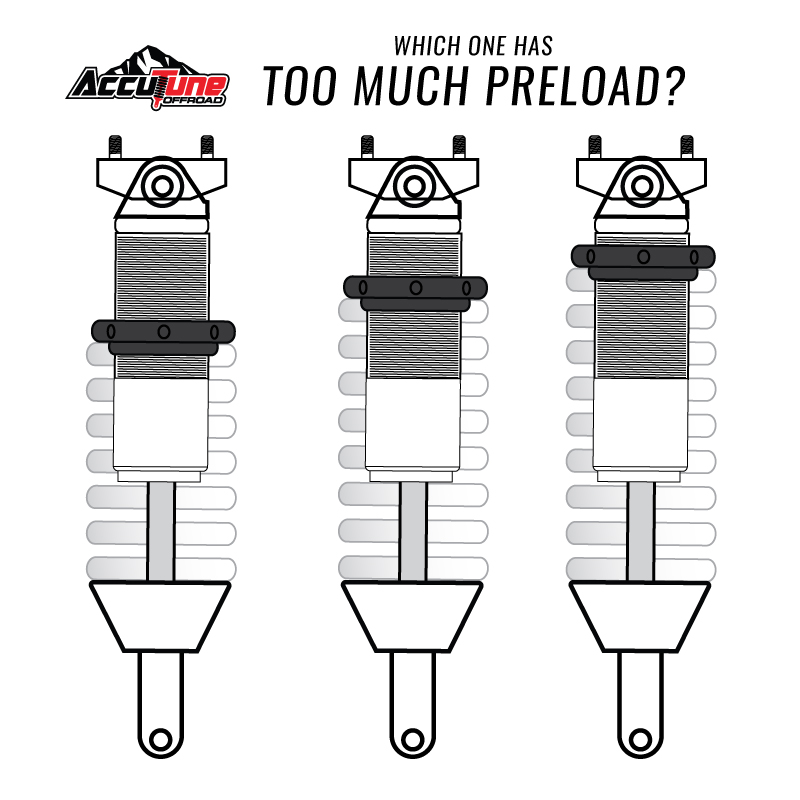
Does Thread Count = Too Much Preload?
Sometimes it’s perfectly fine to have a lot of threads showing above the preload collar—but other times, it might be a sign of too much preload. That said, thread count alone is not a reliable way to tell.
Look at the graphic to the left:
Can you tell which coilover has too much preload? Probably not. Without knowing the shock travel, spring travel, and spring length, it’s impossible to say for sure. Any guess would be just that—a guess.
“Too Many Threads” Is Mostly Personal Preference
Seeing a lot of threads showing is often more about looks than performance. If you want fewer threads showing, you can swap to a different spring rate or length.
Just be sure that:
-
The new spring fits your coilover
-
It has the correct weight rating for your vehicle setup
Always double-check specs before making changes.
What is Coil Bind?
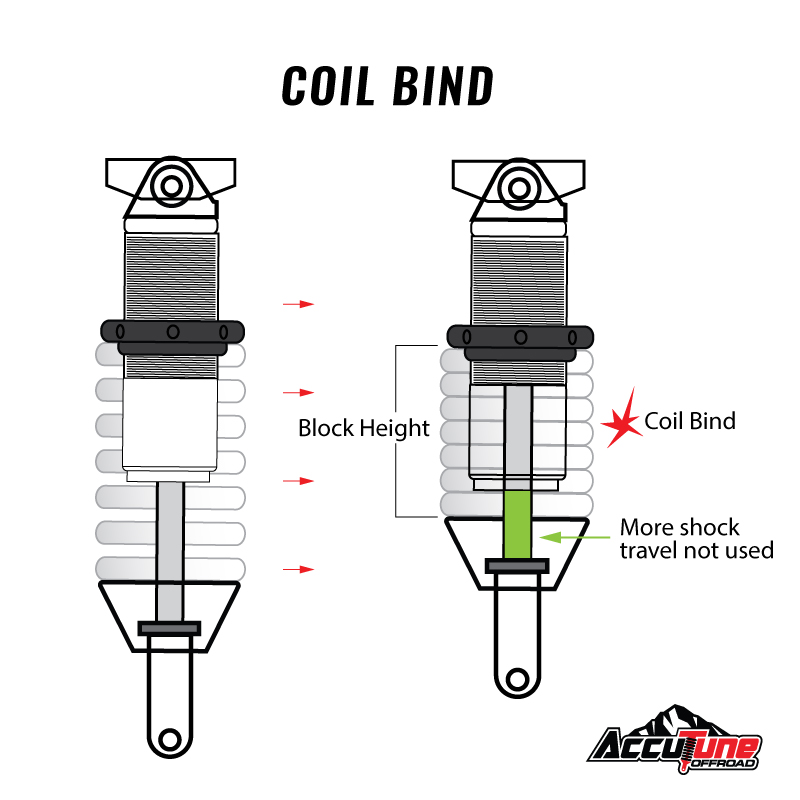
What is Coil Bind?
Too much preload or using the wrong spring rate can cause the spring to compress too far and go into what’s called coil bind.
Coil bind happens when the spring is fully compressed and the coils are stacked tightly together—also known as reaching block height.
When this happens:
-
The spring can’t compress any further
-
Shock travel is cut short
-
You risk damaging the spring and the shock
To avoid coil bind, always use the correct spring rate and limit preload to safe levels.
How do you measure preload?
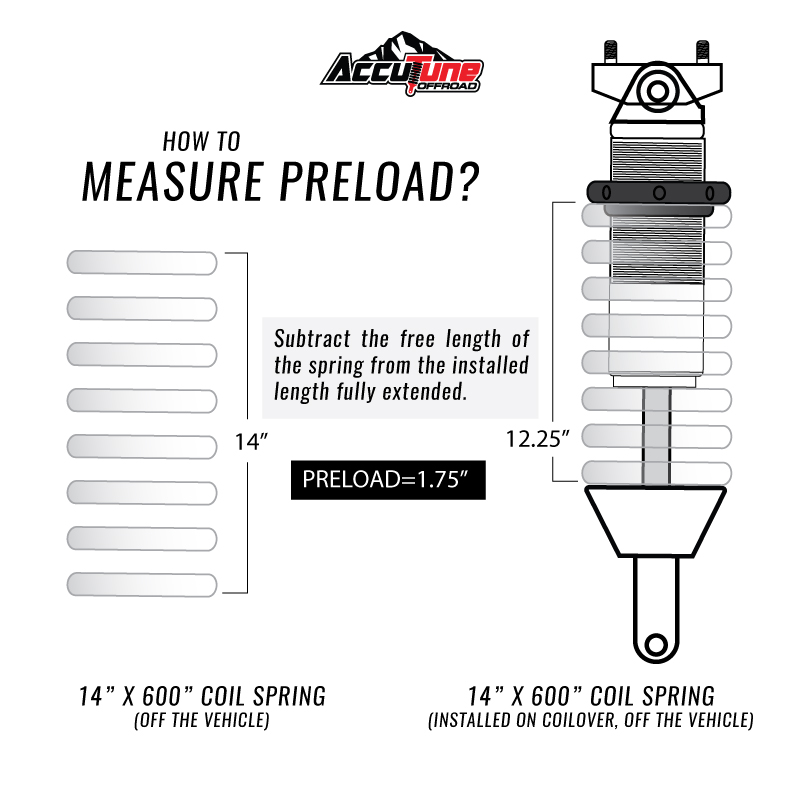
How to Measure Preload on Your Coilover
To measure preload, you first need to know the spring’s free length (its length when not compressed).
-
Most springs have their length and weight rating printed on them.
-
If not, you can find this info on our website or by searching the spring’s part number online.
Next, with the coilover shock fully extended, measure the length of the spring installed.
Finally, subtract the measured length from the spring’s free length:
Preload = Free Spring Length – Installed Spring Length (with shock fully extended)
Example:
If you have a 14” long, 700 lb spring on your Tacoma coilover and it measures 12.25” fully extended, then your preload is:
14” – 12.25” = 1.75” preload
What is the maximum amount of preload you can have?
Preload Limits and Considerations
Preload settings depend on the total shock travel and spring travel of your coilover setup. Keep in mind, preload values can vary from side to side on the front of your vehicle due to weight differences.
-
Minimum Preload = Spring free length minus coilover spring space
Using a spring rate that’s too heavy can cause minimum preload issues and lift the vehicle higher than desired.
-
Maximum Preload = Spring travel minus shock travel
For reference, see the Eibach spring rate information below. Most product pages will list shock travel in the specifications tab to help you calculate your limits.
Spring date from Eibach as of 7/6/21
| Eibach Spring Data | |||||
|---|---|---|---|---|---|
| Part Number | ID | Free Length | Rate | Block Height | Travel |
| ERS-1400.300.0400S | 3 | 14 | 400 | 5.59 | 8.41 |
| ERS-1400.300.0450S | 3 | 14 | 450 | 5.83 | 8.17 |
| ERS-1400.300.0500S | 3 | 14 | 500 | 6.02 | 7.98 |
| ERS-1400.300.0550S | 3 | 14 | 550 | 6.38 | 7.62 |
| ERS-1400.300.0600S | 3 | 14 | 600 | 6.26 | 7.74 |
| ERS-1400.300.0650S | 3 | 14 | 650 | 6.61 | 7.39 |
| ERS-1400.300.0700s | 3 | 14 | 700 | 6.57 | 7.43 |
| ERS-1600.300.0350S | 3 | 16 | 350 | 6.46 | 9.54 |
| ERS-1600.300.0400S | 3 | 16 | 400 | 6.61 | 9.39 |
| ERS-1600.300.0450S | 3 | 16 | 450 | 6.81 | 9.19 |
| ERS-1600.300.0500S | 3 | 16 | 500 | 7.52 | 8.48 |
| ERS-1600.300.0550S | 3 | 16 | 550 | 7.6 | 8.4 |
| ERS-1600.300.0600S | 3 | 16 | 600 | 7.72 | 8.28 |
| ERS-1600.300.0700S | 3 | 16 | 700 | 8.03 | 7.97 |
| ERS-1600.300.0800S | 3 | 16 | 800 | 8.15 | 7.85 |
| ERS-1800.300.0400S | 3 | 18 | 400 | 7.76 | 10.24 |
| ERS-1800.300.0450S | 3 | 18 | 450 | 8.19 | 9.81 |
| ERS-1800.300.0500S | 3 | 18 | 500 | 8.43 | 9.57 |
| ERS-1800.300.0550S | 3 | 18 | 550 | 8.5 | 9.5 |
| ERS-1800.300.0600S | 3 | 18 | 600 | 8.86 | 9.14 |
| ERS-1800.300.0650S | 3 | 18 | 650 | 8.98 | 9.02 |
| ERS-1800.300.0700S | 3 | 18 | 700 | 9.09 | 8.91 |
| ERS-1800.300.0800S | 3 | 18 | 800 | 9.76 | 8.24 |
Do I need a heavier spring rate?
Need a Heavier Spring?
If you’ve followed all the steps above and your coilovers are near the maximum preload setting, it may be time to consider a heavier spring rate.
Feel free to give us a call—we’re happy to review your setup and help recommend the best spring rate for your vehicle and goals.
Do I need a softer spring rate?
How to Tell if Your Truck is Over-Sprung
When evaluating if a truck has too heavy a spring rate (over-sprung), we consider a few factors:
-
Shock length at ride height compared to our maximum recommended shock length
-
The amount of threads showing on the shock body above the preload collar
If the shock is too long at ride height and there’s no way to reduce preload (no room to back off the collar), then a spring rate change is necessary.
For most OEM-fit coilovers, there’s usually no minimum preload required—preload is often just needed to seat the spring onto the coilover.
What if your truck is leaning to one side?
Dealing with Truck Lean
It’s normal for trucks to have a slight lean, usually because one side carries more weight than the other—like a full gas tank, battery, or gear on one side.
This isn’t a problem. You can easily fix it by adding or reducing preload on the coilover on the heavier or lighter side to balance the vehicle.
Important: Do not use spacers on top of the coilovers to correct lean.